We're going to start of with a shot with some blemishes that we want to remove.
 Our first step is to duplicate the background layer twice, for ease of identification an organization put the duplicate layers in a group and rename them. I've renamed the bottom duplicate layer color and the top one texture as well as renaming the group to retouch. This allows us to easily identify the layers we are working on and know what they're doing. At this point, hide the texture layer and select the color layer. Apply a slight blur to the color layer using gaussian blur, just enough to blur the fine details but don't go overboard with it. By hiding the texture layer we can see the effect of the blur on the color layer.
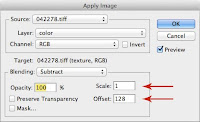
Moving on, we want to unhide and select the texture layer. Go to image - apply image. Your source is the file that you're working on. Under layer select 'color', and channel should be set to RGB.
If you're working with a 16 bit file use the following settings:
Invert: Unchecked
Blending: Subtract
Opacity: 100%
Scale: 1
Offset: 128
If you're working with a 8 bit file use the following settings:
Invert: Checked
Blending: Add
Opacity: 100%
Scale: 0
Offset: 0
Preserve transparency and mask should both be unchecked.

You should have a mid-grey layer with a faint outline of the image. You now want to changing the layer blending option to 'linear light' What this does in effect is create a layer that acts much like the unsharp mask filter, but since we've created two separate layers we can work on the color and texture of the image independently.
To do this, start by again hiding the texture layer and selecting the color layer. I find it easier to start by retouching the color layer without texture so we can see just the effects of the color. Smooth it out using the clone stamp tool or your other favorite method, we want a layer that has even and smooth skin texture with soft gradations in the shadows and highlights. Make sure if using the clone tool that your source is set to current layer. This is why we use a small blur initially, so as to preserve some of the fine edges such as boundaries between the lips and skin or eyes. Once we are satisfied with the color we can unhide and select the texture layer and clean up the texture using the same technique.
Our final image should have a smooth skin but still retain the texture of skin. It's important for the realism of the portrait that there is still texture such as pores, a blurred skin looks fake and should never be acceptable. Using the frequency separation technique outlined here can provide high quality results and can be done quickly. Total time for me on this sample was around 6-7 minutes.
Compare the original photo above to the final retouched version by clicking on either for a larger image.


No comments:
Post a Comment