Wednesday, October 29, 2008

The lens myth explained


It's a common misconception that the shorter a lens, the more distortion the image will receive. And while this may seem like what happens based on what we see, the simple fact remains that it is the object's relationship to the field of view that affects the final representation in the camera.

If we can assume an object to extend out beyond it's edge on a plane lying perpendicular to the camera lens we can extrapolate the size of that object's plane in relationship to the field of view and further express that as a percentage of the camera's frame.

Basically, at any given distance from the camera we want to find out how long of a length is covered perpendicular to the lens. We can then use that information to determine the percentage that a given object has in relation to the fame size.

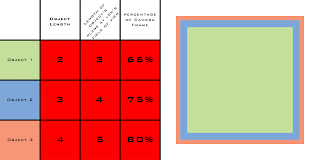
In the above diagram there are 4 "cameras" and 3 "objects". The red camera and the blue camera share the same field of view but a different position. The charts below show the effective size and the percentages of each of the objects in relationship to that specific camera's field of view.

The important thing to note is that while the objects remain stationary and their lengths unchanged, the relationship they exhibit to one another changes in a scalar form as the distance between the object and the lens changes. This is most apparent with the red and blue cameras which both share the same angular field of view with only a change in the distance from the objects.

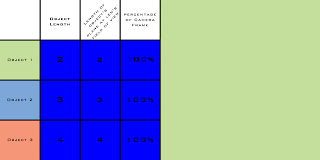
As we move our position (the camera) from the position of the red camera to the position of the blue camera the difference in relationship of each of the objects to the field of view changes until eventually each of the objects has a 100% of the frame's size in which each object overlaps the one behind them totally.

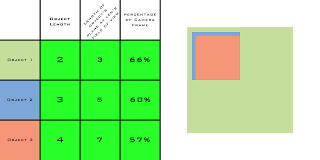
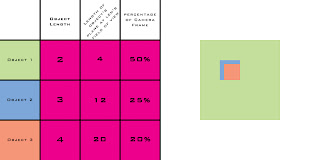
Continuing on, as we approach the green and subsequently the purple camera positions the effect of each object in relationship to each other continues until we reach the point where the difference in each field of view becomes greatly distorted. At the point we reach the position of the purple camera the 2nd object which is 150% the size of the first object becomes distorted to appear to be half the size (or thinking of it in reverse, the smaller object appears twice as large as the (in reality) larger object.

This happens simply because the object fills less of the frame since it's relationship to the field of view represents a smaller percentage within the total coverage for an object at that distance.

(it should be noted that the view's for the green and purple camera's have a cut out in the top left 1/4 of the first object to show where the subsequent objects would fall in relationship. The blue and red cameras both show a representation of how the objects would stack normally)


What we can get from this is that in order for an object of the same size to fill the same amount of space in the camera's frame we must use a wider lens as we move closer and a longer lens as we move away. In fact, both the red camera and the green camera represent object 1 as 66% of the frame. This is evidenced by both the charts as well as the first diagram where the intersection of object 1's plane is shared by both the red camera and the green camera's field of view.

An interesting change in the relationship happens however if we were to move the purple camera to the position of the red camera (a distance 6 times as far). If we move the purple camera object one will fill 0.083 percent of the frame, object 2 0.093 percent, and object 3 0.1 percent of the frame. The reason this is interesting is that the relationship of the sizes of each object remains roughly equivalent. 66% is 83% of 80%, whereas 0.083% is 83% of 0.1%, therefore the relationship of objects at any distance remains roughly equivalent at any given field of view.

Friday, July 11, 2008

Photoshop 101 : Levels

Last week I went over how to set up a product shot using just a few supplies from around the house. Today I am going to work on some basic image control techniques. I would like to stress a small pet peeve I have about calling this editing or photoshopping; first is that editing is the process of selection, and second is that photoshop is not needed for any of the techniques below since most any photo manipulation software can do this.

I mention that last one for those that are using photoshop elements or some other program, since the buttons and names may be different. If you aren't using photoshop or similar and would like to have a decent photo manipulating without any cost to you (and legally too), consider GIMP. I've not used it myself but it is an option to you. gimp.org

To begin our tutorial I am using a photo I took in a junk yard. Notice how the colors are lifeless and the photo is flat. For this exercise (and anytime you talk about photos), the term flat is used to denote an image that has low contrast, or range from darkest to lightest. A histogram such as the two in the levels control windows below shows a map of the concentration of values along the tonal range of the image. Sound complicated? It's not... Starting at the left of the histogram is the darkest spot and we get continuously brighter as we go further right. The far right is the brightest spot. The funny looking shape inside the window is the histogram itself, and is just a representation of the percentage of pixels that are that particular level of brightness.


Looking at the levels dialogs there are
three controls under the histogram, those little triangle are the controls we are going to use for this exercise. Now, I stress that using tools like auto levels may be a one click adjustment, but in my mind it is not a solution. Auto levels picks these points for you; we are here to learn how to pick them ourselves. To do this, we need to remember that the histogram is just a range of the current image's tones, the triangles on the bottom are where our white mid and black points will be after clicking okay.

Why is this important you may ask? Well, each image and hence each histogram is different and we want to be able to learn how to move the controls appropriately. Remember those bell curves from school where the teacher took the highest grade and the lowest grades and made those the tops and bottoms of the test and your grade fell somewhere between them? Well, that's what we're going to do with levels.

In my sample image's histogram above you can see how the image is not distributed evenly, it has very little in the darkest areas. What we've done is move the dark triangle to the right. We are effectively saying that this point above the triangle is where we want the bell curve to fall. In this case, we've moved the black triangle to just slightly past the first little bit of of the hill. Why did we do this? Because moving it into the area rather then just at the beginning will give us a slightly punchier contrast which is what we want.

I also moved the grey slider a little bit to, it controls the mid point of our bell curve. We usually want to adjust our mid points to control the contrast of our highlights OR our shadows. This one is also more subjective and depends on the individual image so you should play around with this one yourself.

Lastly I felt that image looked fine tonally, but the color was a little lacking. So I opened up the hue/saturation tool and pulled in a bit more saturation here. BUT, in a step that is often over looked, I used the drop down menu to work on the red channel (and the yellow channel as well) since I felt the rest of the spectrum (blues and greens) looked fine. Here I added a small amount of saturation to the reds channel and yellows to bring out the rust of the cable and the yellow paint. This added a bit more pop to the image which to me was exactly what was needed.

In looking at the image before we did any corrections to it to our final image we can see a huge increase in the image's tone and color. We started at a washed out flat image and ended up with something that has a full contrast range and has colors that pop. End the end, we've only used two tools and a few clicks of the mouse but we've had complete control the whole time. It may be a little more then clicking auto, but in this sample clicking auto would introduce a magenta color cast and leave us with a flat image.

I hope that this tutorial has provided you with some tips and a little more info on how to use photoshop to enhance your images. I'd love to see some before and after photos.

Tuesday, July 8, 2008

Photography 101 : Products


As an aide to those interested in shooting small objects such as jewelry or in this case a tape measure I'm going to start off my tutorials with a tabletop product shot demonstration. First thing I want to point out is I am in fact not using fancy equipment (other then my dSLR) to achieve this. Most of what you'll need you can find around the house already, or improvise where needed. So first, what is needed for this shot?

Materials:

1. Camera (any kind will do with one caveat, your life will be a million times easier if the camera has a manual mode. I'll go into this in a minute)
2. Product
3. Five sheets of typing paper
4. Table lamp.
5. Tripod (or something to rest the camera on)
6. Tape or 2 paper clips

Let's build our set shall we? First, take a sheet of paper and fold it in half widthwise. Then fold that in half what would have been lengthwise. Fold both sides of that to make a letter W (or M depending on which way you folded). You want to end up with a W shape however. Now, take another sheet of paper and tape the top edge to the arms of the W... You want this sheet to rest against your table and curve up in the back. This is the stage where your product will sit.

Take two more sheets of paper and fold each in half widthwise and set them on either side of the stage fold side up. Take your last sheet and make a small accordion fold along the center
lengthwise. Open it back up and smooth it out only a little (you should have a notch running down the paper, but you don't want it to high, this is only for structural support). Take this sheet and lay it on top of the two folded sheets on the sides, you should have the accordion fold facing up.

Take the table lamp, hopefully it's the kind that is on the arm that you can move around since what we want to do is put the light over the top sheet of paper. What we've done basically is create a tent with the product in the center. The sheet on the back swoops up so it looks like we have a white surface that goes on indefinitely, just what we want.

Place the camera on a tripod or other steady surface (we want the camera above the item and looking down on it). It helps to to back up and zoom in rather then stay close. Make sure you aren't catching any of the edges of the sheets. Having the camera on a tripod or steady surface helps to eliminate motion blur since we're not usually getting a ton of light from the lamp.

Now for that caveat I mentioned about the camera. You can get through this even if your camera doesn't have a manual (or at least exposure compensation) function. The problem is that we want to overexpose the scene. The camera takes an average of what it sees and guesses at the exposure. It tries to put this at a mid grey exposure, so that large area of white is going to look grey if you let the camera do it's thing without intervention. If we can let in more light now we can save ourselves some trouble in having to adjust it in the computer later. If your camera doesn't let you change the exposure we can adjust that in the next tutorial.

That's it. We've just taken our first product shot and if you've done everything right you probably won't need to do much post-processing work. If you do, we'll cover that in the next tutorial.

I would love to know if you use this technique, leave a link in the comments section.

Thanks, Paul

Sunday, June 15, 2008

The path of being a genius


is oft shared with that of being insane.  Case in point...  Ripping apart a 20 dollar plastic toy camera, folding up some paper bellows and rubber banding it all together to a digital camera body.

Not that anyone could ever consider it to be a quality camera or well crafted, but that's a holga for you.  But, anyone one taking it apart and putting the lens onto a camera that costs 75 times as much is shear lunacy.  What do I expect out of this?  Probably not much more then bragging rights.  Lens is crap, the bellows are held on by rubber bands, and the exposure is all over the place.  It was fun and gave me something to do on father's day since no one did anything for me.

edited for posterity, Jonah did call at 9:12 to wish me a happy fathers day

Tuesday, May 27, 2008

Field of dreams


So, I've officially named my project.  It's still a working title for now, but whatever.  I'm having WAY more luck in getting models for these projects then I am for the fashion stuff.  On one hand, it's easier to find someone that fits the model profile for this project, since there is no profile.  In fashion, you're always looking for the tall skinny girls because that's what the designers design for.  My project has no guidelines, anyone can be a model.

To me, I find it so ironic that we as people take for granted the natural world and consider ourselves to be lords of the earth when in fact we are nothing but a small part.  The series has a certain play on that theme by placing the models in fields but focusing on the surroundings and not on the model.

We are born naked and it is only our distaste for nature, our lust for 'civilization', and our shame of our own self's that we choose to cover up and hide away our true nature.  We are a part of this earth, and we must learn to live in balance with her.

In metaphor I've chosen to place the focus of the imagery on nature, and humanity as a prominent but not key element.  Humanity may be a significant factor, a deadly and destructive factor at that, but in the end, we are nothing more then a footnote on the pages of time.

Whether through our own self infliction or the course of time, earth will prevail long after humanity is gone.  The question is how much are we going to leave behind.

Monday, April 14, 2008

April 14 2008


I finally got to work with the wonderful Amber Kloss; it's been probably at least a year if not more since we first started talking about to do a shoot.  Amber has wonderful and abundent selection of vintage outfits so the plan was to shoot something for my class's 'Time Machine' assignment.  When she got here and we got to talking about the assignment, she asked if the assignment could be from the future rather then the past and pulled out the crazy red outfit.  We ended up shooting both time periods, 1960 and 2060.  Ha ha, I'm so cool.

Friday, April 4, 2008

April 4 2008


I'm posting a few for today because I've kind of fallen a little behind.

One of the great things about being a photographer is working with really cool models.  Monika is one such person.  Not only is she a great model but she is also such a pleasure to talk with.

Also, I found a really cool place to shoot, and will most likely come back here more then a few times.  You can turn around or walk a few feet and be in a totally different environment.  This is one of those places that I really wish I had a car so I could just go shoot at on my own time too.  The cool trestle, cracked mud, dirt paths, and over-grown plant life are just super cool...  I'd love to come back out and do some of my more artsy photography in this spot.

Sunday, March 30, 2008

Picture of the day 30 March 2008


It's rare that I find so many ironies in life...  I had put up an ad on craigslist looking for some models for my class.  I had been in contact with this girl for about a week, we had tentatively set up a date in the middle of the week to shoot on friday but nothing ever got nailed down.  I send a text to her this morning since today was our fall back day to see if we were still going to shoot.  At first, she texted me back that she had gone out last night and hand a hangover this morning and that she probably wasn't going to do a great job...  I texted back that it was no big deal; I had no pressing reasons to shoot, no deadlines et cetera; so it wasn't a big deal.

A few minutes later I get a text from her.  And here is where it starts to get weird.  See, a few years back I had taken a class at school with this guy named tim who since then has gone on and is working for a company shooting graduations and proms and stuff like that...  Well, a month or so ago I get an email from him asking if I would be interested in shooting with him.  Of course, being as cool as I am I say yes.  Well, flash forward to today and her text; Tim is there with her and says hi!  Of course, I seize on the opportunity to exploit Tim and text her back telling her to tell him to tell her to shoot with me.  YAY, we set up a time for later in the day.

We are shooting and Tim mentions that not only is she a photographer too, but she's also going to be working for him too...  And, to make things even weirder, her and I are probably going to be shooting together in 2 weeks.

Now, my question of the day (along with my picture of the day) is how small exactly is the world?

Sunday, March 23, 2008

Picture of the day 23 March 2008


I've been in a funk recently in regards to my photography.  I haven't been finding the time to finish all that I've needed to get done for my class.  Models as they liked to be called keep flaking out, I've been sick, et cetera.  I've shot this whole weekend though, and I'm starting to feel accomplished again.

Shot Friday, stuff didn't quite go how I wanted and ended up spending hours on post on one image.  Shot saturday and the images came back much much better.  Shot this today and must say that it's not often that I am really floored by what I've shot.  There are a few turning points or markers in my path that I recognize as mile stones.  This image, in lack of better words, is simply stunning to me.  To each their own though I guess, it's a love it or leave it kind of image.

Saturday, March 22, 2008

Picture of the day 22 March 2008


Shot a much better set then Friday's.  I really love this image from the set.  I can't really justify using the crappy cover shot that I mocked up, I think this one is worlds better.  In fact, I'm kind of ashamed of the other shot.

I only dream I could shoot for anthropologie.  Damn, that's something to pin on the cork-board.

Thursday, March 20, 2008

Picture of the day 20 March 2008


Repair underway under the freeway. Near Old Sacramento and the Amtrak station. Really liked the sun coming in from the side and the linearness of the elements.

4 groups with layer masks, 5 adjustment layers, 2 layers. Probably about 1-1.5 hours time wasted.

Picture of the day 20 March 2008


Since I've been falling behind in posting, I'm posting a few pictures from my little excursion to Old Sacramento.  I may end up following suit, i.e., posting at least one picture a day, and more if I can.

No photoshop retouching on this, only minor raw adjustments in Aperture.

Monday, March 17, 2008

Picture of the day 17 March


I've been out sick nearly a week now, bedridden for most of it.  Really nasty little bug, and the antibiotics are making me feel pretty shitty.  Aside from going back in yesterday for surgery I can say I've been feeling better; comparatively I suppose to had I not started the medication when I did.  I'll never know.

On a lighter note, I was graced today with the pleasurable news that I would get to dust off the old camera in exchange for a sandwich.  The 2nd fastest way to my heart is with a sandwich.  The first fasted way to my heart is also the subject of my Picture of the day for 17 March 2008.

God has not and can not create a woman who rivals her beauty.

Handmade scarf available at http://www.jessmc.etsy.com

Monday, March 10, 2008

Picture of the day 11 March


This one is coming in a week late. Being sick for a week knocked me out in both shooting and editing. I'm back dating this one so it shows up in line though.

Picture of the day 10 March


Another post that I shot but didn't upload.  Silly me.  I took Jonah out to the train museum then did a little shopping today.  I picked up these glasses at Gap for him.  They are just a little loose on him, but he sure is my little man.  Couldn't be more proud of him.  I love being a father, but maybe it's cause I have such a great kid.  I'd love to have some more some day...  Jessica?

Friday, March 7, 2008

Picture of the day 7 March


Something about seeing your son and his mother playing that just warms the heart.  Helps that they're both very special to me.

Wednesday, March 5, 2008

PIcture of the day 5 March


Don't know what it was about this one, didn't get out to shoot very much this day but for some reason this one connected with me.  As plain as it is for some reason I felt like this was todays POTD.

Tuesday, March 4, 2008

Picture of the day 4 March

Starting off here I think on a great start.  I really really dig this image, which is a shame since I got so many other really cool images from scooting about in the back.  I really love the colors and the selective focus (gotta love a 200mm at 2.8).